
What is OAuth?
OAuth is an open standard for access delegation. It allows a user to grant a third-party application limited access to their resources (e.g., Google Photos, GitHub repositories) without sharing their credentials (username and password). Instead, OAuth uses tokens to securely manage access.
- OAuth 1.0: Launched in 2007, it used a signature-based system. It’s now largely obsolete.
- OAuth 2.0: Introduced in 2012 via RFC 6749, it’s a simpler, more flexible redesign and the focus of this guide.
Why Use OAuth?
Imagine you want a photo-editing app to access your Google Photos. Without OAuth, you’d share your Google password—risky! OAuth lets you authorize the app to access only your photos, for a limited time, without exposing your credentials.
Key Concepts in OAuth 2.0
Here are the core components:
- Resource Owner: The user who owns the data (e.g., you with your Google Photos).
- Client: The third-party app requesting access. It may include:
- Frontend: The user interface (e.g., browser, mobile app).
- Backend: The server handling secure operations.
- Authorization Server: Authenticates the user and issues tokens (e.g., Google’s OAuth server).
- Resource Server: Hosts the protected data (e.g., Google Photos API).
- Access Token: A credential the client uses to access resources.
- Refresh Token: A long-lived credential to renew access tokens.
- Scope: Permissions requested (e.g., “read photos”).
These components interact differently in each OAuth flow, with distinct roles for the frontend and backend.
OAuth 2.0 Flows (Grant Types)
OAuth 2.0 provides multiple flows for different use cases. Below, we’ll detail each one, explicitly calling out the frontend and backend roles.
1. Authorization Code Flow
The most secure and common flow, ideal for web apps with both a frontend (browser) and a backend (server). The backend securely stores a client_secret.
How It Works:
- The user clicks “Login with Google” on the frontend.
- The frontend redirects the user to the authorization server with
client_id,redirect_uri, andscope. - The user authenticates and approves the request.
- The server redirects back to the frontend with an authorization code.
- The frontend forwards the code to the backend.
- The backend exchanges the code and
client_secretwith the authorization server for an access token (and often a refresh token). - The backend uses the access token to access the resource server.
Diagram:

When to Use:
- Web apps with a server (e.g., Node.js, Django).
Security Note:
The client_secret ensures only the trusted backend can exchange the code for a token.
2. Implicit Flow
Designed for clients without a backend, like single-page apps (SPAs) or mobile apps. The frontend handles everything, but it’s less secure.
How It Works:
- The user clicks “Login with Google” on the frontend.
- The frontend redirects to the authorization server with
client_id,redirect_uri, andscope. - The user logs in and approves.
- The server redirects back to the frontend with an access token in the URL fragment (e.g.,
#access_token=xyz). - The frontend extracts and uses the token to access the resource server.
Diagram:

When to Use:
- SPAs (e.g., React) or mobile apps without a backend.
Security Note:
The token in the URL is vulnerable (e.g., browser history). Use Authorization Code Flow with PKCE instead (see below).
3. Resource Owner Password Credentials Flow
The frontend collects the user’s credentials directly. It’s for trusted first-party apps, with no backend typically involved.
How It Works:
- The user enters their username and password in the frontend.
- The frontend sends these to the authorization server.
- The server returns an access token (and possibly a refresh token) to the frontend.
- The frontend uses the token to access the resource server.
Diagram:

When to Use:
- Trusted first-party apps (e.g., a company’s mobile app).
Security Note:
Avoid this flow unless necessary—it exposes credentials to the frontend.
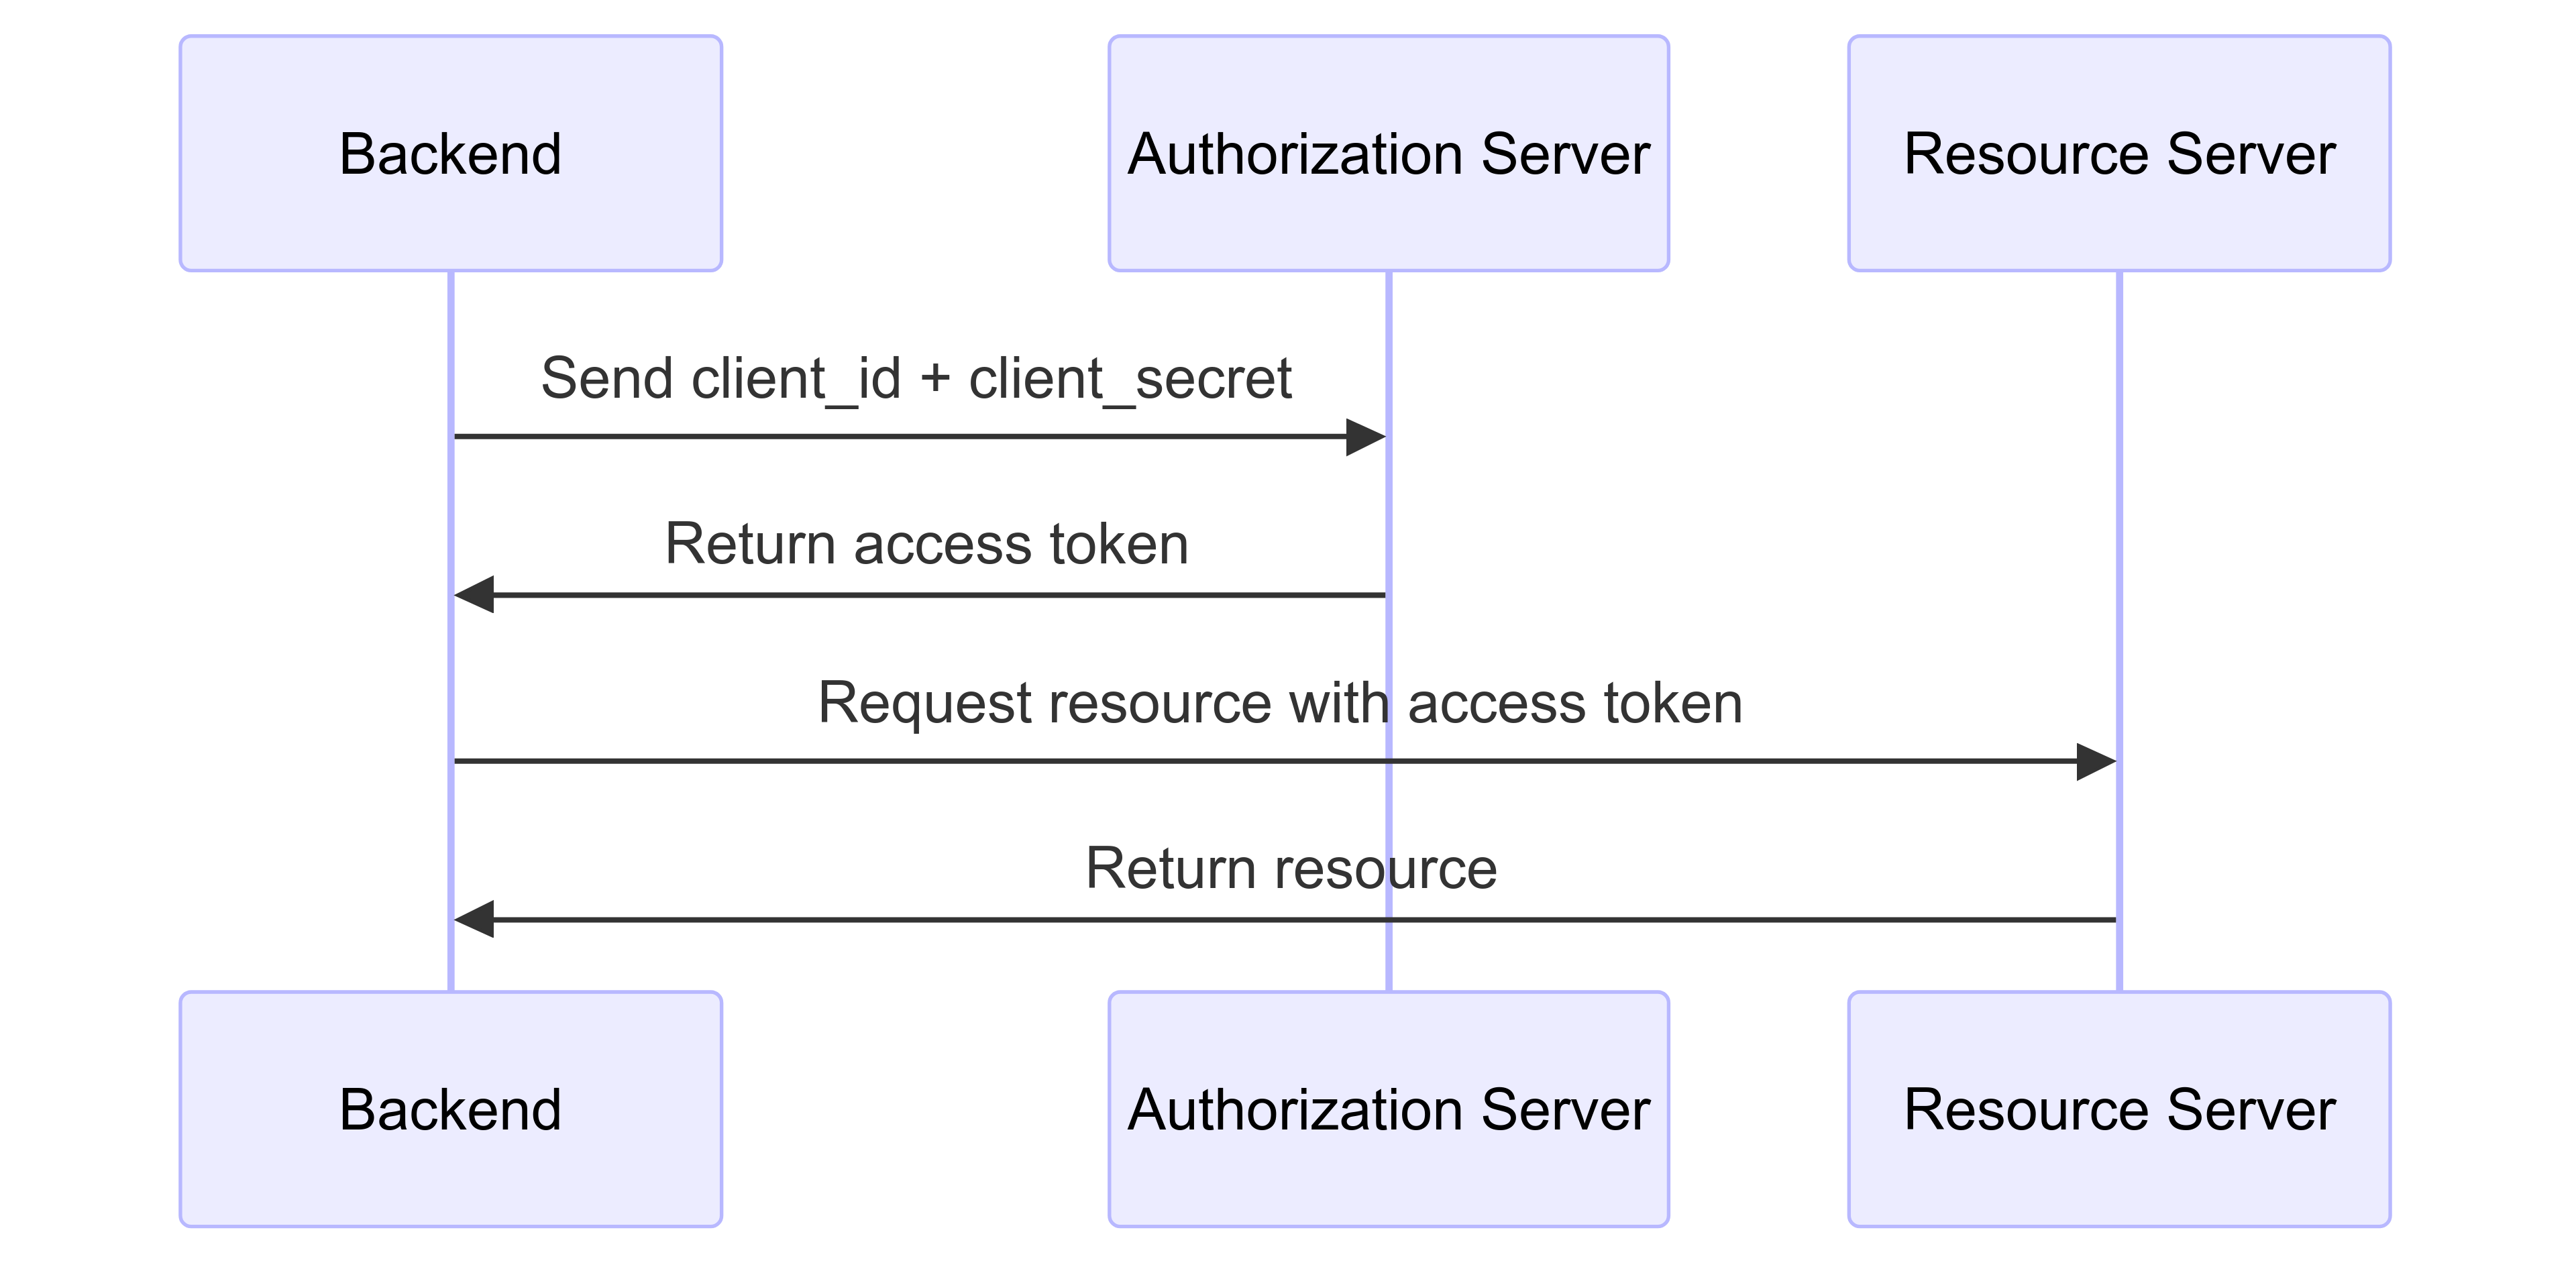
4. Client Credentials Flow
For server-to-server communication, where only the backend is involved—no frontend or user interaction.
How It Works:
- The backend sends its
client_idandclient_secretto the authorization server. - The server issues an access token to the backend.
- The backend uses the token to access the resource server.
Diagram:
When to Use:
- Machine-to-machine tasks (e.g., a cron job accessing an API).
Understanding Tokens
Tokens are the heart of OAuth 2.0:
Access Token
- Purpose: Accesses resources.
- Lifetime: Short (e.g., 1 hour).
- Format: Opaque string or JWT (see JWT section).
Refresh Token
- Purpose: Renews access tokens without re-authentication.
- Lifetime: Long (e.g., months).
- Usage: Sent by the backend (or frontend in some flows) to the authorization server.
Example Refresh Request:
POST /token HTTP/1.1
Host: authorization-server.com
Content-Type: application/x-www-form-urlencoded

grant_type=refresh_token&refresh_token=<refresh_token>&client_id=<client_id>&client_secret=<client_secret>
Response:
{
  "access_token": "new-access-token",
  "expires_in": 3600,
  "refresh_token": "new-refresh-token" // Optional
}
Token Revocation
Revoke tokens when they’re no longer needed (e.g., logout, security breach).
How It Works:
- The backend (or frontend in frontend-only flows) sends a revocation request to the authorization server.
- The server invalidates the token.
Example:
POST /revoke HTTP/1.1
Host: authorization-server.com
Content-Type: application/x-www-form-urlencoded

token=<access_token>&token_type_hint=access_token&client_id=<client_id>&client_secret=<client_secret>
When to Use:
- Logout or token compromise.
Logging Out a Client
OAuth 2.0 doesn’t natively support logout since tokens are stateless. Here’s how to handle it:
- Revoke Tokens:
- The backend (or frontend) revokes access and refresh tokens.
- Short-lived Tokens:
- Use brief access token lifetimes (e.g., 5 minutes).
- Session Management:
- Use OpenID Connect (see below) for session-based logout.
Example:
- User clicks “Logout” on the frontend.
- The frontend notifies the backend.
- The backend revokes tokens via the revocation endpoint.
Advanced Concepts
PKCE (Proof Key for Code Exchange)
Enhances security for public clients (e.g., SPAs, mobile apps) in the Authorization Code Flow. Only the frontend is involved.
How It Works:
- The frontend generates a
code_verifierand hashes it into acode_challenge. - The frontend sends the
code_challengewith the authorization request. - After receiving the code, the frontend sends the
code_verifierto get a token. - The server verifies the match.
Diagram:

When to Use:
- Public clients instead of Implicit Flow (RFC 7636).
JWT (JSON Web Tokens)
Access tokens can be JWTs, with three parts: Header, Payload, Signature.
Example:
eyJhbGciOiJIUzI1NiIsInR5cCI6IkpXVCJ9.eyJzdWIiOiIxMjM0NTY3ODkwIiwibmFtZSI6IkpvaG4gRG9lIiwiZXhwIjoxNTE2MjM5MDIyfQ.SflKxwRJSMeKKF2QT4fwpMeJf36POk6yJV_adQssw5c
Benefits:
- Self-contained and verifiable (RFC 7519).
Best Practices
- Use HTTPS: Encrypt all requests.
- Minimal Scopes: Request only necessary permissions.
- Short-lived Tokens: Limit exposure.
- Secure Storage: Store tokens securely (e.g., backend database, not browser storage).
- PKCE for Public Clients: Always use it.
Common Pitfalls
- OAuth as Authentication: Use OpenID Connect for identity.
- Insecure Storage: Avoid URL parameters or local storage.
- Ignoring Expiration: Handle it gracefully.
Putting It All Together
Example (Authorization Code Flow):
- User clicks “Login” on the frontend.
- Frontend redirects to Google’s auth endpoint.
- User approves, gets a code.
- Backend exchanges code for tokens.
- Backend fetches resources.
Additional Nearby Concepts
Here are more concepts to enrich our understanding:
OpenID Connect (OIDC):
- Extends OAuth 2.0 for authentication with an ID token.
- Specification.
Token Introspection:
- Validates tokens via the authorization server (RFC 7662).
Bearer Tokens:
- Sent in headers (e.g.,
Authorization: Bearer <token>) (RFC 6750).
- Sent in headers (e.g.,
State Parameter:
- Prevents CSRF by tying requests to sessions (Security Best Practices).
Client Registration:
- How clients get credentials (RFC 7591).
OAuth 2.1:
- An upcoming update consolidating best practices (e.g., deprecating Implicit Flow) (Draft RFC).
SAML vs. OAuth:
- SAML is for authentication; OAuth is for authorization.
Federated Identity:
- Using OAuth/OIDC across providers (e.g., “Login with Google”).
Conclusion
OAuth 2.0 is a versatile authorization framework. We’ve explored:
- Core concepts and flows, with explicit frontend/backend roles.
- Token management and security.
- Advanced features like PKCE and JWTs.
- Nearby topics like OIDC and introspection.
For most apps, start with the Authorization Code Flow (with PKCE for public clients), to secure tokens, and explore OpenID Connect for authentication.